
RECEIVE CIRCUIT


TRANSMITTER CIRCUIT
For the second construct the circuit with refer the schematic diagram like we are doing from the PCB DESIGN but now we are just only construct the circuit using the breadboard

and also what we do it in this week is we are doing etching that etching is the process of using strong acid to cut into the unprotected parts of a metal surface to create a design in print-making in the metal.
Now that you're itching to etch . . .
After you go through all the preliminaries in the preceding sections, you get to actually etch your printed circuit board.
Follow these steps to etch the board:
1. Pour the etchant into the plastic tray carefully, avoiding spills and splashes.

Pour enough etchant to create a pool at least 1/8-inch thick, preferably 1/4-inch thick.
2. Dunk the board into the tray and continually rock it back and forth.

3. Keep the board in the soup for 10 to 30 minutes
(depending on the type and strength of the etchant) or until the etchant
has removed all the excess copper. Keep that tray a-rockin — but
gently!
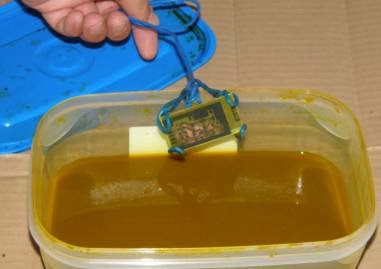
4. Use the plastic or wooden tongs to lift the board out of the tray from time to time to check progress.

The enchant removes the copper, starting from the edges and areas
close to the resist. Large, open areas of copper can be stubborn and
take 2 to 3 times as long to etch completely. You may want to agitate
those areas of the copper that don't respond as quickly to the enchant.
However, be sure that you don't over-agitate because you can undercut the
copper under the resist. Undercutting happens when enchant oozes under the resist and attacks the copper that you don't want to remove. After that we are also transfer the circuit from breadboard to the strip board .
