
so for this week also we are do it program the arduino for our project .
This is just for review to help our friend to use manually this microcontroller .
Burning the Bootloader
If you have a new ATmega328 (or ATmega168), you'll need to burn the bootloader onto it. You can do this using an Arduino board as an in-system program (ISP). If the microcontroller already has the bootloader on it (e.g. because you took it out of an Arduino board or ordered an already-bootloadedATmega), you can skip this section.
To burn the bootloader, follow these steps:
- Upload the ArduinoISP sketch onto your Arduino board. (You'll need to select the board and serial port from the Tools menu that correspond to your board.)
- Wire up the Arduino board and microcontroller as shown in the diagram to the right.
- Select "Arduino Duemilanove or Nano w/ ATmega328" from the Tools > Board menu. (Or "ATmega328 on a breadboard (8 MHz internal clock)" if using the minimal configuration described below.)
- Run Tools > Burn Bootloader > w/ Arduino as ISP.
You should only need to burn the bootloader once. After you've done so, you can remove the jumper wires connected to pins 10, 11, 12, and 13 of the Arduino board.

<==== Using an Arduino board to burn the bootloader onto an ATmega on a breadboard.
Once your ATmega328p has the Arduino bootloader on it, you can upload programs to it using the USB-to-serial convertor (FTDI chip) on an Arduino board. To do, you remove the microcontroller from the Arduino board so the FTDI chip can talk to the microcontroller on the breadboard instead. The diagram at right shows how to connect the RX and TX lines from the Arduino board to the ATmega on the breadboard. To program the microcontroller, select "Arduino Duemilanove or Nano w/ ATmega328" from the the Tools > Board menu (or "ATmega328 on a breadboard (8 MHz internal clock)" if you're using the minimal configuration described below). Then upload as usual.
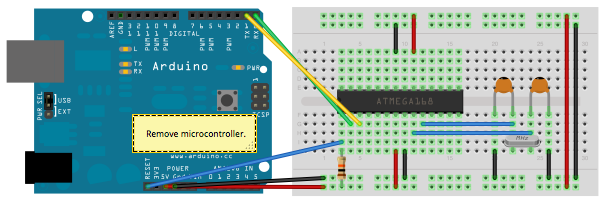
Uploading sketches to an on a
breadboard. Remember to remove ======>
the microcontroller from the
Arduino board!
Minimal Circuit (Eliminating the External Clock)
If you don't have the extra 16 MHz crystal and 18-22 picofarad capacitors used in the above examples, you can configure the ATmega328 to use its internal 8 MHz RC oscillator as a clock source instead. (You don't really need the 10K pullup resistor on the reset pin either, so we remove it to get a truly minimal configuration.)
You'll need to install support for an additional hardware configuration:
- Download this hardware configuration archive: Breadboard.zip
- Create a "hardware" sub-folder in your Arduino sketchbook folder (whose location you can find in the Arduino preferences dialog). If you've previously installed support for additional hardware configuration, you may already have a "hardware" folder in your sketchbook.
- Move the "breadboard" folder from the zip archive to the "hardware" sub-folder of your Arduino sketchbook.
- Restart the Arduino software.
- You should see "ATmega328 on a breadboard (8 MHz internal clock)" in the Tools > Board menu.
Once you've done this, you can burn the bootloader and upload programs onto your ATmega328 as described above. Be sure to select "ATmega328 on a breadboard (8 MHz internal clock)" when burning the bootloader. (If you select the wrong item and configure the microcontroller to use an external clock, it won't work unless you connect one.)

<====== Using an Arduino board to burn the bootloader onto an ATmega on a breadboard (w/o an external clock).

Uploading sketches to an ATmega on a breadboard ==>
Getting Rid of the Arduino Board
Once you've programmed the ATmega on the breadboard, you can eliminate the Arduino. To do so, you'll need to provide an alternative power supply for the microcontroller .so this is just review for help a reader who want to know how to use that from Arduino to a Microcontroller on a Breadboard and based from our project we are not use this technique because we are strightly using arduino uno for our based in using microcontroller . so now we are teach the beginner like we how to use arduino .
// just review and reminder again

Hardware Setup
- Install USB to UART driver.
- Connect Arduino UNO to computer via USBcable.
- Open Arduino IDE.
- Choose your board under Tools-> Board->Arduino UNO.
- Choose COM port under Tools-> Serial Port-> COM ? (Check from Device Manager).
Software Setup
- Open Blink Example, File-> Examples->1.Basic-> Blink

1st Compile and Load
- Click Compile
- There should be no error as it is example code.
- Click Upload
- Rx & Tx LEDs on Arduino will blink, and“Done uploading” will appear on IDE.
- After a few seconds, the LED (pin 13) onArduino will start blinking ~ 0.5Hz.
Modifying the code
- Save as another file, maybe as “my_Blink”
- Modify the blinking rate, become 1Hz, 2Hz or faster.
